Introduction
AxonDeepSeg is an open-source software using deep learning and aiming at automatically segmenting axons and myelin sheaths from microscopy images. It performs multi-class semantic segmentation using a convolutional neural network.
AxonDeepSeg was developed at NeuroPoly Lab, Polytechnique Montreal, University of Montreal, Canada.
Testimonials
Do you also use AxonDeepSeg and would like to share your feedback with the community? Please add your testimonial by clicking here. Thank you 😊
Anne Wheeler, PhD | Hospital for Sick Children | Canada 🇨🇦
Our lab uses ADS to segment and extract morphometrics of myelinated axons from from EM images of mouse white matter tracts. We have two in-progress studies where ADS is allowing us to efficiently extract this data in the context of abberant white matter development. ADS is very well documented and easy to use and implement. In addition, the developers have been very responsive to our requests for additional functionality. Thank you!
Alison Wong, MD/MSE | Dalhousie University | Canada 🇨🇦
I found AxonDeepSeg very helpful for my research on peripheral nerve injury and regeneration. It performed well at segmentation and very well at obtaining the measurements, this greatly increased the ability to analyze out outcomes. There will always be attempts at new and better software, but the fact that the AxonDeepSeg team has focused on an open source format with continued development is commendable. I found the GitHub to be essential.
Osvaldo Delbono, PhD | Wake Forest University School of Medicine | United States 🇺🇸
We utilize AxonDeepSeg for post-mortem nerve analysis of individuals afflicted with Alzheimer’s Disease, related dementias, parkinsonism, and vascular deterioration affecting both the central and peripheral nervous systems. Given that our samples comprise thousands of axon/myelin units within the tibialis nerve, AxonDeepSeg is indispensable for our research. The documentation for AxonDeepSeg is comprehensive, with the guidelines for software installation being especially helpful.
Alan Peterson, PhD | McGill University | Canada 🇨🇦
Our investigation involved 6 lines of gene-edited mice that elaborate myelin sheaths of greatly different thickness. We used AxonDeepSeg to quantify myelin/axon relationships in tiled EM images from multiple tracts in young to old mice thus making this a very large experiment. AxonDeepSeg worked perfectly throughout. To obtain the maximum resolution we excluded fibers in which demonstrated fixation artifacts such as myelin splitting and the filtering step was easily accommodated in the work flow. Along the way, we required minimal support but when needed, it was both excellent an timely.
Installation
The following sections will help you install all the tools you need to run AxonDeepSeg.
Install AxonDeepSeg
To install AxonDeepSeg, in a terminal window (macOS or Linux) or Command Prompt (Windows), “clone” AxonDeepSeg’s repository (you will need to have git installed on your system) and then open the directory:
git clone https://github.com/neuropoly/axondeepseg.git
cd axondeepseg
Then, for Linux or macOS systems, run:
./install_ads
and follow the prompts. Or, if you want to install AxonDeepSeg with default settings, run:
./install_ads -y
Note
Linux systems can accelerate some of AxonDeepSeg’s functions with an NVIDIA GPU, but these are expensive and rare, and if you do not own one you can save some time and space by not downloading the accelerated codes. You can do this by putting this in your pip.conf before continuing:
# ~/.config/pip/pip.conf
[install]
extra-index-url =
  https://download.pytorch.org/whl/cpu
For Windows systems, run:
install_ads.bat
Then, to use ADS’s command-line scripts in Command Prompt, please follow these instructions:
Open the Start Menu -> Type ‘edit environment’ -> Open ‘Edit environment variables for your account’
Click ‘New’, then enter ‘ADS_DIR’ for the variable name. For the value, copy and paste the path to the ADS directory (see full path displayed after install_ads.bat is completed)
Click ‘OK’, then click on the ‘Path’ variable, then click the ‘Edit…’ button.
Click ‘New’, then copy and paste the (ADS_PATH)bin directory:
Click ‘OK’ three times. You can now access ADS’s scripts in the Command Prompt.
Testing the installation
Quick test
To test if the software was installed correctly, you can launch a quick integrity test by running the following command on the terminal:
axondeepseg_test
This integrity test automatically performs the axon and myelin segmentation of a test sample. If the test succeeds, the following message will appear in the terminal:
* * * Integrity test passed. AxonDeepSeg is correctly installed. * * *
Comprehensive test
To run the entire testing suite (more code coverage), run:
axondeepseg_test --full
If all tests pass, AxonDeepSeg was installed succesfully.
Graphical User Interface (GUI)
AxonDeepSeg can be run via a Graphical User Interface (GUI) instead of the Terminal command line. This GUI is a plugin for the software Napari. Beyond the convenience of running AxonDeepSeg with the click of a button, this GUI is also an excellent way to manually correct output segmentations (if needed).

Launch Napari
ads_napari
In Napari, do the following:
- Click on Plugins -> ADS plugin (napari-ads)
In the [Manual Correction](#manual-correction-of-segmentation-masks) section of the documentation, we provide a short tutorial describing how to use the AxonDeepSeg plugin for Napari.
Software Development with AxonDeepSeg
To develop code in the AxonDeepSeg software package and use it in a python shell, and to run the full test suite, you’ll need to first activate your virtual environment:
ads_activate
Note
To switch back to your default environment, run:
conda deactivate
If using AxonDeepSeg in a Jupyter Notebook, you’ll need to ensure that the virtual environment’s kernel is selected, or open Jupyter notebook from within an activated virtual environment.
Existing models
The generalist model is shipped together with the installation package and is recommended for initial use of the software.
Several other more specialized models are available.
For each model, a light and/or ensemble version is available. Light models are smaller size, whereas the ensemble versions may have slightly better segmentation performance.
Here are the details of all the models currently supported by AxonDeepSeg:
generalist model (model_seg_generalist): Multi-domain axon and myelin segmentation model trained on TEM, SEM, BF and CARS data. For more information, please visit the generalist model repository.
dedicated-SEM model (model_seg_rat_axon-myelin_SEM): Axon and myelin segmentation model trained on Scanning Electron Microscopy data. For more information, please visit the SEM model repository.
dedicated-BF (bright-field) model (model_seg_generalist_BF): Axon and myelin segmentation model trained on Bright-Field data. For more information, please visit the BF release of the generalist model repository.
dedicated-CARS (Coherent Anti-Stokes Raman Scattering) model (model_seg_rat_axon-myelin_CARS): Axon and myelin segmentation model trained on Coherent Anti-Stokes Raman Scattering data. For more information, please visit the CARS model repository.
unmyelinated-TEM model (model_seg_unmyelinated_sickkids): Unmyelinated axon segmentation model trained on TEM data. For more information, please visit the unmyelinated-TEM model repository.
To download these models, you must first have AxonDeepSeg installed. Afterwards, run:
download_model -m <model name> -t <model type>
where <model name> is the full name (e.g. model_seg_rat_axon-myelin_SEM) and <model type> is either light or ensemble. To view available models and their details, run:
download_model --list
Using AxonDeepSeg
Example dataset
You can demo the AxonDeepSeg by downloading the test data available here. It contains two SEM test samples and one TEM test sample.
Segmentation
Syntax
The script to launch is called axondeepseg. It takes several arguments:
Required arguments:
- -i IMGPATH
Path to the image to segment or path to the folder where the image(s) to segment is/are located.
Optional arguments:
- -m MODEL
Folder where the model is located, if different from the default model.
- -v VERBOSITY
Verbosity level.
0 (default): Quiet mode. Shows minimal information on the terminal.
1: Developer mode. Shows more information on the terminal, useful for debugging..
- --gpu-id GPU_ID
Number representing the GPU ID for segmentation if available. Default: None.
Note
You can get the detailed description of all the arguments of the axondeepseg command at any time by using the -h argument:
axondeepseg -h
Segment a single image
To segment a single microscopy image, specify the path to the image to segment in the -i argument. For instance, to segment the SEM image ‘77.png’ of the test dataset that has a pixel size of 0.07 micrometers, use the following command:
axondeepseg -i test_segmentation/test_sem_image/image1_sem/77.png
The segmented acquisition will be saved in the same folder as the acquisition image, with the suffix ‘_seg-axonmyelin.png’, in png format, along with the binary axon and myelin segmentation masks (with the suffixes ‘_seg-axon.png’ and ‘_seg-myelin.png’). In our example, the following output files will be generated: ‘77_seg-axonmyelin.png’, ‘77_seg-axon.png’ and ‘77_seg-myelin.png’.
Segment multiple images of the same resolution
To segment multiple microscopy images of the same resolution that are located in the same folder, specify the path to the folder in the -i argument. For instance, to segment the images in folder ‘test_sem_image/image1_sem/’, use the following command:
axondeepseg -i test_segmentation/test_sem_image/image1_sem/
Please note that when using axondeepseg, a file called axondeepseg.log will be saved in the current working directory. The console output will be saved in this file so you can review it later (useful to process large folders).
Segment images from multiple folders
To segment images that are located in different folders, specify the path to the folders in the -i argument, one after the other. For instance, to segment all the images of folders ‘test_sem_image/image1_sem/’ and ‘test_sem_image/image2_sem/’ of the test dataset, use the following command:
axondeepseg -i test_segmentation/test_sem_image/image1_sem/ test_segmentation/test_sem_image/image2_sem/
Morphometrics
You can generate morphometrics using AxonDeepSeg via the command line interface.
Syntax
The script to launch is called axondeepseg_morphometrics. It has several arguments.
Required arguments:
- -i IMGPATH
Path to the image file whose morphometrics needs to be calculated.
Optional arguments:
- -s SIZEPIXEL
Pixel size of the image(s) to segment, in micrometers. If no pixel size is specified, a pixel_size_in_micrometer.txt file needs to be added to the image folder path (that file should contain a single float number corresponding to the resolution of the image, i.e. the pixel size). The pixel size in that file will be used for the morphometrics computation.
- -a AXONSHAPE
Axon shape circle: Axon shape is considered as circle. In this case, diameter is computed using equivalent diameter. ellipse: Axon shape is considered as an ellipse. In this case, diameter is computed using ellipse minor axis. The default axon shape is set to circle.
- -f FILENAME
Name of the excel file in which the morphometrics will be stored. The excel file extension can either be .xlsx or .csv. If name of the excel file is not provided, the morphometrics will be saved as axon_morphometrics.xlsx.
- -b
Flag to extract additionnal bounding box information on axonmyelin objects. Specifying this option
-bflag will add a boolean value indicating if the axon touches one of the image border. It will also output every axon’s bounding box (including its myelin). For more information, see the morphometrics file description in the subsection below.- -c
Flag to save the colorized instance segmentation. For more information about this feature, see the Colorization subsection below.
- -u
Toggles unmyelinated mode. This will compute morphometrics for unmyelinated axons. Note that this requires a separate unmyelinated axon segmentation mask with suffix
_seg-uaxon.
Morphometrics of a single image
Before computing the morphometrics of an image, make sure it has been segmented using AxonDeepSeg
axondeepseg_morphometrics -i test_segmentation/test_sem_image/image1_sem/77.png -a circle -f axon_morphometrics
This generates a ‘77_axon_morphometrics.xlsx’ file in the image directory:
image1_sem/
├── 77.png
├── 77_seg-axon.png
├── 77_seg-axonmyelin.png
├── 77_seg-myelin.png
├── 77_axon_morphometrics.xlsx
└── pixel_size_in_micrometer.txt
Morphometrics of a specific image from multiple folders
To generate morphometrics of images which are located in different folders, specify the path of the image folders using the -i argument of the CLI separated by space. For instance, to compute morphometrics of the image ‘77.png’ and ‘image.png’ present in the folders ‘test_sem_image/image1_sem/’ and ‘test_sem_image/image2_sem/’ respectively of the test dataset, use the following command:
axondeepseg_morphometrics -i test_segmentation/test_sem_image/image1_sem/77.png test_segmentation/test_sem_image/image2_sem/image.png
This will generate ‘77_axon_morphometrics.xlsx’ and ‘image_axon_morphometrics.xlsx’ files in the ‘image1_sem’ and ‘image2_sem’ folders:
--image1_sem/
---- 77.png
---- 77_seg-axon.png
---- 77_seg-axonmyelin.png
---- 77_seg-myelin.png
---- 77_axon_morphometrics.xlsx
---- pixel_size_in_micrometer.txt

...

--image2_sem/
---- image.png
---- image_seg-axon.png
---- image_seg-axonmyelin.png
---- image_seg-myelin.png
---- image_axon_morphometrics.xlsx
---- pixel_size_in_micrometer.txt
Morphometrics of all the images present in folder(s)
To compute the morphometrics of batches of images present in folder(s), input the path of the directories using the -i argument separated by space. For example, the morphometrics files of the images present in the directories ‘test_sem_image/image1_sem/’ and ‘test_sem_image/image2_sem/’ are computed using the following CLI command:
axondeepseg_morphometrics -i test_segmentation/test_sem_image/image1_sem test_segmentation/test_sem_image/image2_sem
This will generate ‘77_axon_morphometrics.xlsx’ and ‘78_axon_morphometrics.xlsx’ morphometrics files in the ‘image1_sem’ directory. And, the ‘image_axon_morphometrics.xlsx’ and ‘image2_axon_morphometrics.xlsx’ morphometrics files are generated in the ‘image2_sem’ directory:
--image1_sem/
---- 77.png
---- 77_seg-axon.png
---- 77_seg-axonmyelin.png
---- 77_seg-myelin.png
---- 77_axon_morphometrics.xlsx

---- 78.png
---- 78_seg-axon.png
---- 78_seg-axonmyelin.png
---- 78_seg-myelin.png
---- 78_axon_morphometrics.xlsx

---- pixel_size_in_micrometer.txt

...

--image2_sem/
---- image.png
---- image_seg-axon.png
---- image_seg-axonmyelin.png
---- image_seg-myelin.png
---- image_axon_morphometrics.xlsx

---- image2.png
---- image2_seg-axon.png
---- image2_seg-axonmyelin.png
---- image2_seg-myelin.png
---- image2_axon_morphometrics.xlsx

---- pixel_size_in_micrometer.txt
Please note that when using the axondeepseg_morphometrics command, the console output will be logged in a file called axondeepseg.log in the current working directory.
Axon Shape: Circle vs Ellipse
Circle
Usage
axondeepseg_morphometrics -i test_segmentation/test_sem_image/image1_sem/77.png -a circle
Studies using Circle as axon shape:
Duval et al: https://pubmed.ncbi.nlm.nih.gov/30326296/
Salini et al: https://www.frontiersin.org/articles/10.3389/fnana.2017.00129/full
Ellipse
Usage
axondeepseg_morphometrics -i test_segmentation/test_sem_image/image1_sem/77.png -a ellipse
Studies using Ellipse as axon shape:
Payne et al: https://pubmed.ncbi.nlm.nih.gov/21381867/
Payne et al: https://pubmed.ncbi.nlm.nih.gov/22879411/
Fehily et al: https://pubmed.ncbi.nlm.nih.gov/30702755/
Note
In the literature, both equivalent diameter and ellipse minor axis are used to compute the morphometrics. Thus, depending on the usecase, the user is advised to choose axon shape accordingly.
Morphometrics file
The resulting ‘axon_morphometrics.csv/xlsx’ file will contain the following columns headings. Most of the metrics are computed using skimage.measure.regionprops.
By default for axon shape, that is, circle, the equivalent diameter is used. For ellipse axon shape, minor axis is used as the diameter. The equivalent diameter is defined as the diameter of a circle with the same area as the region.
Field |
Description |
|---|---|
x0 |
Axon X centroid position in pixels. |
y0 |
Axon Y centroid position in pixels. |
gratio |
Ratio between the axon diameter and the axon+myelin (fiber) diameter (gratio = axon_diameter / axonmyelin_diameter). |
axon_area |
Area of the axon region in \({\mu}\)m2. |
axon_perimeter |
Perimeter of the axon object in \({\mu}\)m. |
myelin_area |
Difference between axon+myelin (fiber) area and axon area in \({\mu}\)m2. |
axon_diameter |
Diameter of the axon in \({\mu}\)m. |
myelin_thickness |
Half of the difference between the axon+myelin (fiber) diameter and the axon diameter in \({\mu}\)m. |
axonmyelin_area |
Area of the axon+myelin (fiber) region in \({\mu}\)m2. |
axonmyelin_perimeter |
Perimeter of the axon+myelin (fiber) object in \({\mu}\)m. |
solidity |
Ratio of pixels in the axon region to pixels of the convex hull image. |
eccentricity |
Eccentricity of the ellipse that has the same second-moments as the axon region. |
orientation |
Angle between the 0th axis (rows) and the major axis of the ellipse that has the same second moments as the axon region. |
image_border_touching |
Flag indicating if the axonmyelin objects touches the image border |
bbox_min_y |
Minimum y value of the bounding box (in pixels). This bound is inclusive. |
bbox_min_x |
Minimum x value of the bounding box (in pixels). This bound is inclusive. |
bbox_max_y |
Maximum y value of the bounding box (in pixels). This bound is exclusive. |
bbox_max_x |
Maximum x value of the bounding box (in pixels). This bound is exclusive. |
Colorization
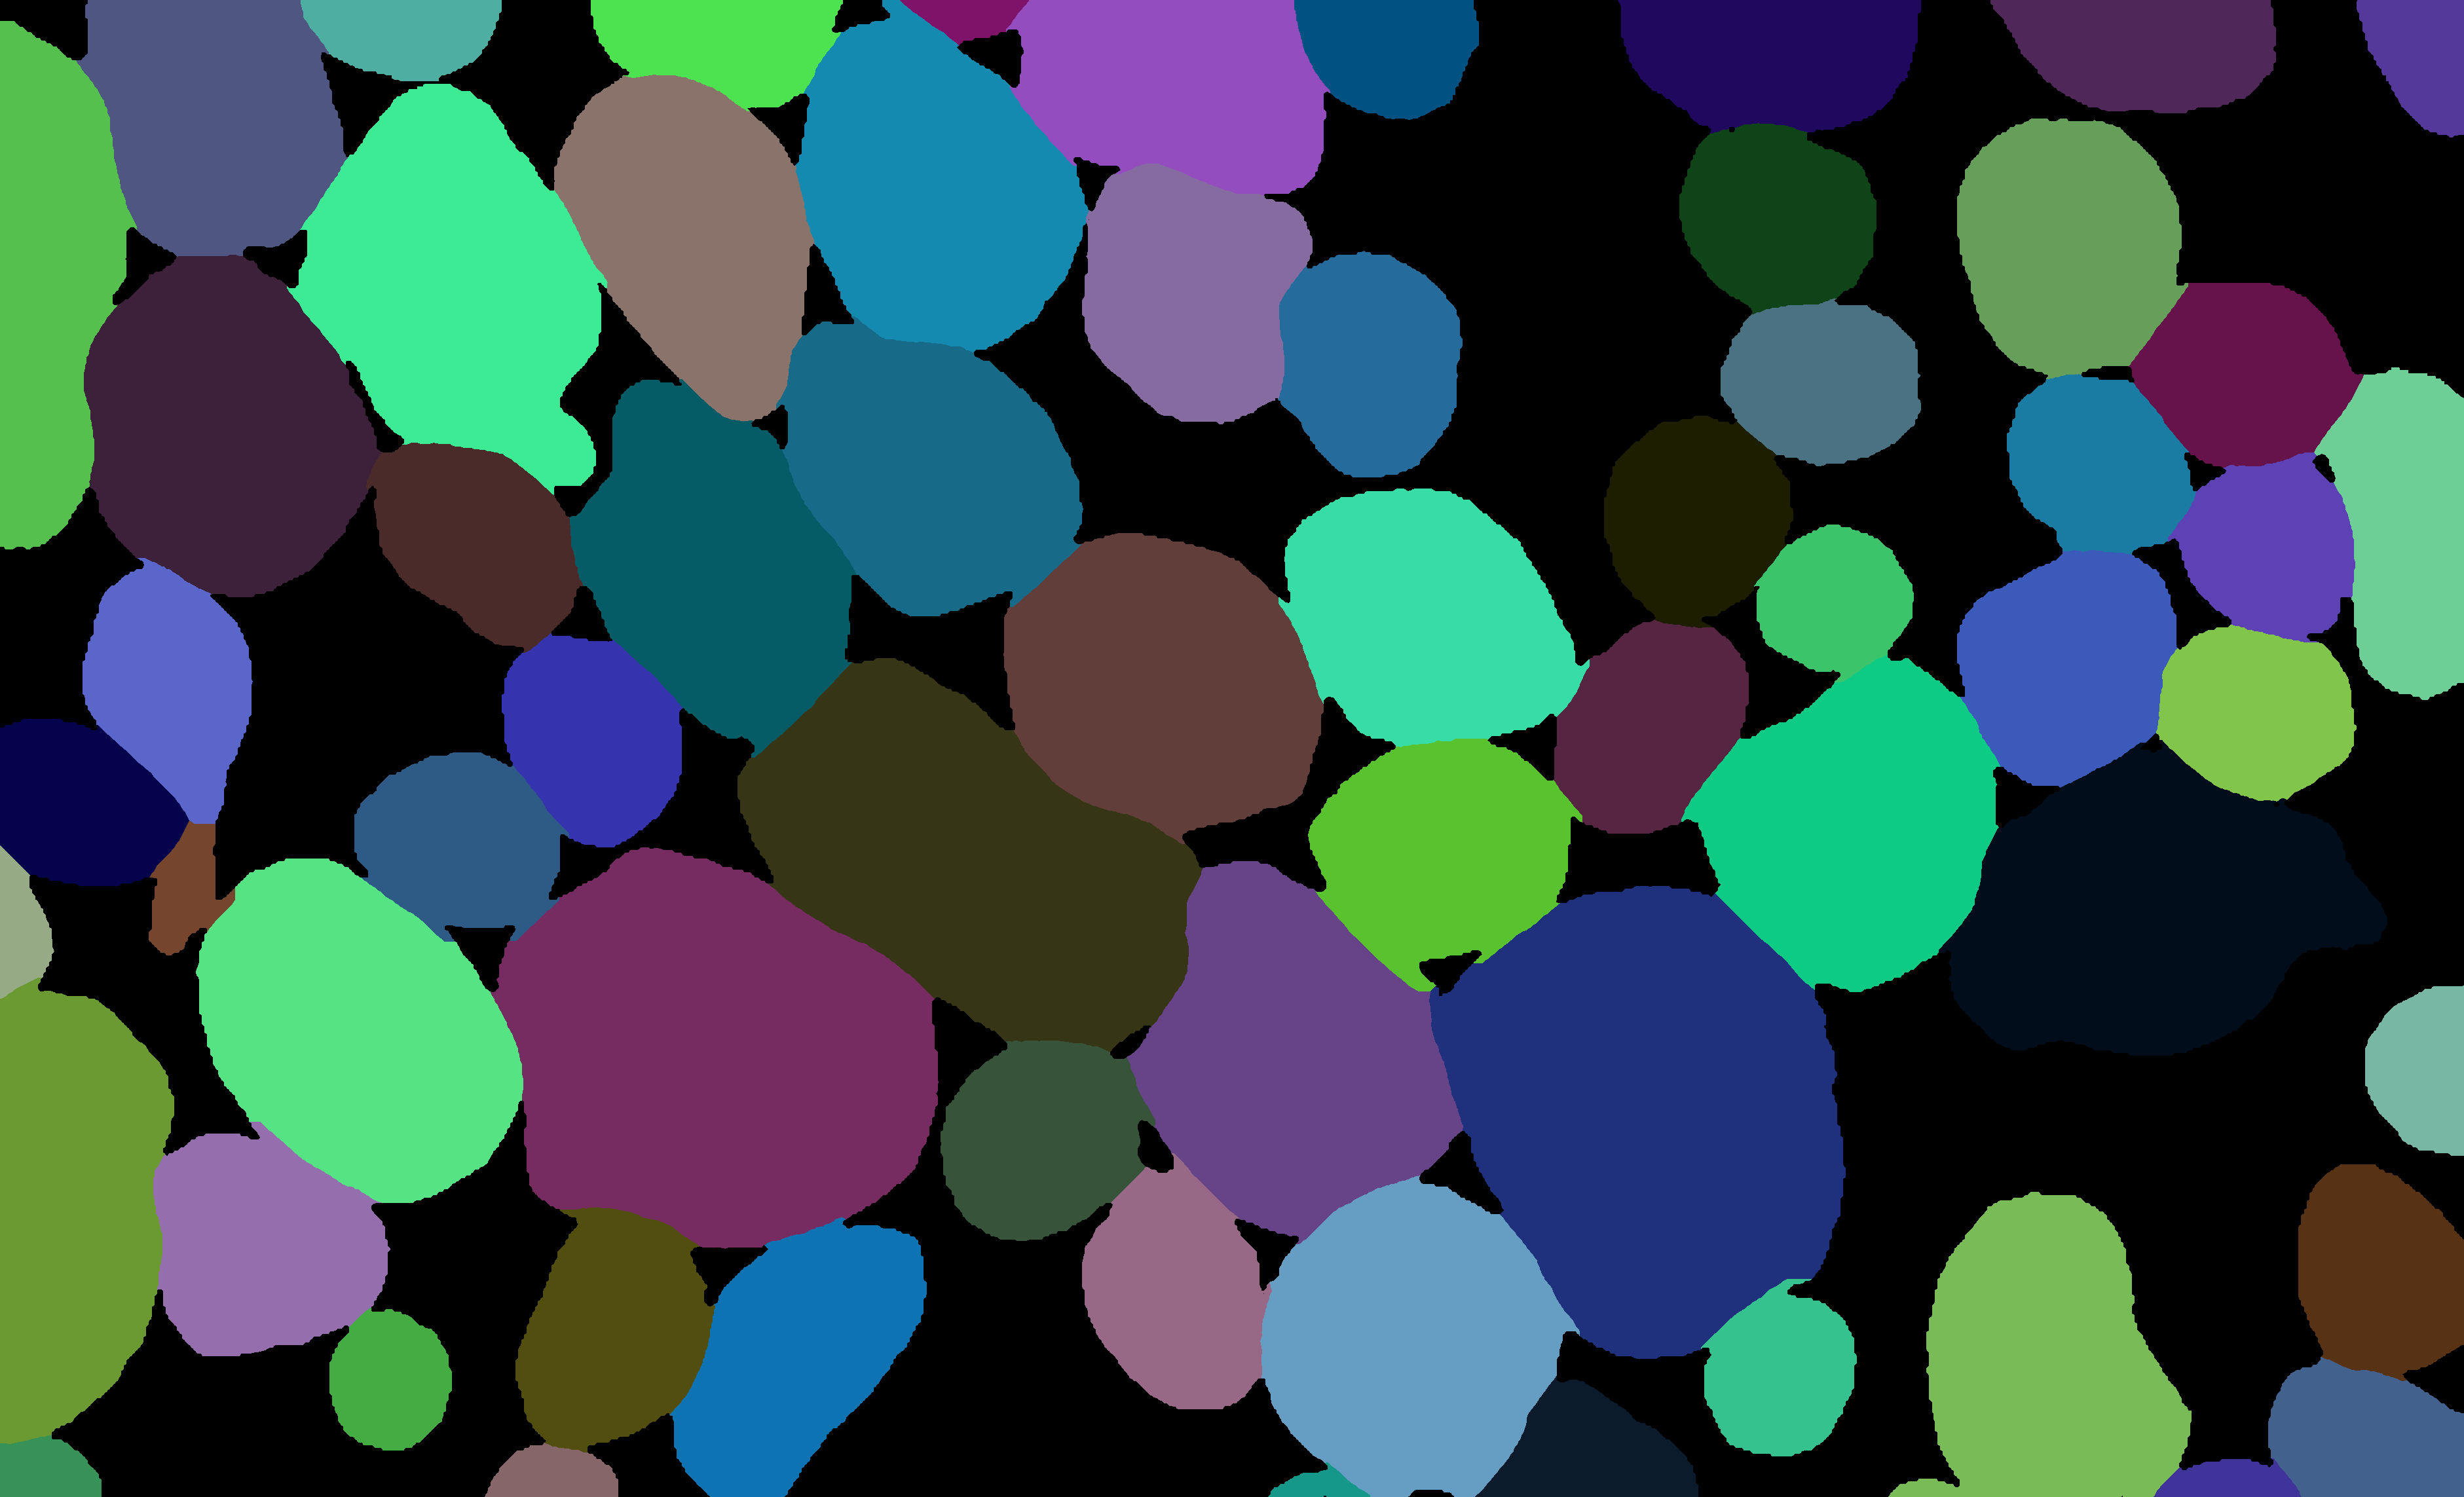
During the morphometrics computation, axondeepseg internally converts the semantic segmentation (output of the deep learning model) into an instance segmentation. This step is essential to take measurements on individual axons when the axon density is high, because if two or more elements have their myelin touching, the software needs to know which axon it is attached to. Using the -c flag, you can obtain the colorized instance segmentation to take a look at this internal representation. The image below illustrates what a typical instance segmentation looks like.
Implementation details
The following sections provide more details about the implementation of the algorithms behind the morphometrics computation.
Diameter estimation
The diameter \(D\) is computed differently based on the chosen axon shape:
For the circle axon shape, the diameter is simply the equivalent diameter of the axon region, which is the diameter of a circle with the same area as the axon region.
For the ellipse axon shape, the computation is entirely different. We do not actually need to fit an ellipse to get the minor axis length. Instead,
sklearncomputes this by using the second order central moments of the image region, which represents the spatial covariance matrix of the image. By computing its eigenvalues, we get the moment of inertia along the axis with the most variation and the axis with the least variation, which are respectively the major and minor axes of the ellipse. We can recover the minor axis length using the moment of inertia formula:\[I = \frac{1}{4} mr^2 \Leftrightarrow r = 2\sqrt{\frac{I}{m}}\]Assuming a uniform unit mass, we finally get \(D = 2r = 4\sqrt{I}\).
Eccentricity estimation
The eccentricity computation is based on the same principle as the diameter estimation for the ellipse axon shape. We use the eigenvalues of the second order central moment of the image, which gives us the moment of inertia along the major axis and the minor axis. The formula to compute the eccentricity of an ellipse is \(e = \sqrt{1 - \frac{b^2}{a^2}}\), where \(a\) and \(b\) respectively represent the lengths of the semi-major and semi-minor axes. Since the ratio \(\frac{a}{b}\) is equivalent to the ratio of the central moment eigenvalues, they are used instead of the actual lengths because they are easier to compute.
Manual correction of segmentation masks
If the segmentation with AxonDeepSeg does not give optimal results, you can try one of the following options:
Napari plugin
Open image and mask
Open Napari by entering ads_napari in the terminal.
Load the AxonDeepSeg plugin using the Napari toolbar: Plugins -> ADS plugin (napari-ads)
Load the microscopy image using the Napari toolbar: File -> Open file(s)
- If no segmentation masks already exists:
Choose one of AxonDeepSeg’s default models in the dropdown menu “Select the model”
Then click on the Apply ADS model button
- If a segmentation masks already exists:
Click on the “Load mask” button and select the image with the suffix “_seg-axonmyelin”
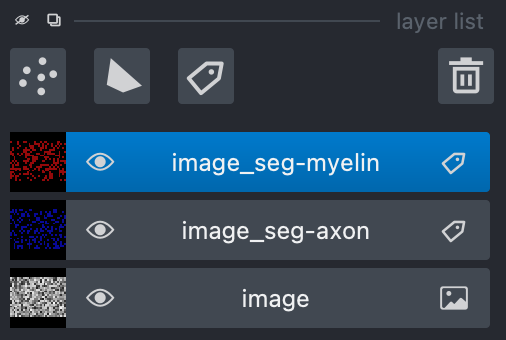
After a mask is loaded or generated, the axon (blue) and myelin (red) layers will be overlayed on top of the histology image.
- In the “layer list” panel on the left, you will find 3 layers (image, axon mask, and myelin mask).
To show or hide layers, click on the eye icon.
To edit a layer, make sure that it is highlighted by clicking on it. In the following example, the myelin layer is selected.
- To zoom on the image, use two fingers on your trackpad and swipe up (zoom in) or down (zoom out), or use the zoom wheel on your mouse.
If it’s not working, ensure that the “Pan/zoom mode” button (magnifying icon
 ) is selected on the left “layers control” panel.
To pan on the image, click and drag your trackpad or mouse.
Modify the mask
Click the mask (myelin or axon) that you want to modify in the “layer list” panel.
To edit the mask you chose, select one of the three editing modes in the “layer control” panel on the left.
- Paint brush
 : Add pixels to the mask.
 The size of the paint brush is determined by the “brush size” option in the “layer list” panel.
- Paint brush
- Eraser
 : Remove pizels from the mask.
 The size of the eraser is also determined by the “brush size” option in the “layer list” panel.
- Eraser
Bucket tool
 : Fills a closed area of the mask with the values of that same mask.
Note
Zooming and panning are disabled while editing the mask. To regain these functionalities, click on the magnifying icon to re-activate it.
The “Fill axons” button in the AxonDeepSeg plugin (right panel) can also be used to edit the masks, and overall can speed up your workflow.
Note
The “Fill axon” button will fill closed myelin mask areas by painting in the axon mask. A good workflow if starting from scratch would be to manually segment all the myelin in the image and then click the “Fill axons” button to fill in the axon areas.
Warning
The “Fill axons” functionality will not behave properly if there are myelin objects not closed, or if multiple myelin objects touch each other to form a big closed cluster.
Modify the mask
Click the “Save segmentation” button in the AxonDeepSeg plugin (right panel).
Note: In case of an overlap between the axons mask and the myelin mask, the myelin will have priority when saving the new segmentation.
The “_seg-axon.png” and “_seg-myelin.png” are the axons-only and myelin-only binary masks.
- The “_seg-axonmyelin.png” file is the axon+myelin mask.
Note that this mask is a PNG 8-bit file with 1 channel (256 grayscale), with color values of 0 for background, 127 for myelin and 255 for axons.
GIMP software
To create a new axon+myelin manual mask or to make manual correction on an existing segmentation mask, you can use the GIMP software (Link for download).
If you are making correction on an existing segmentation mask, note that when you launch a segmentation, in the folder output, you will also find the axon and myelin masks (with the suffixes ‘_seg-axon.png’ and ‘_seg-myelin.png’). You can then manually correct the myelin mask and create a corrected axon+myelin mask.
For a detailed procedure, please consult the following link: Manual labelling with GIMP.
Training Models
If the current models available in AxonDeepSeg do not perform sufficiently well with your dataset or for your appliucations and you are interested in training a model for AxonDeepSeg for your specific dataset, please reach out to the AxonDeepSeg to schedule a video-call to discuss more.
Note
To get more information on how our current models were trained, please refer to this GitHub repository: https://github.com/axondeepseg/model_seg_generalist
Help
Whether you are a newcomer or an experienced user, we will do our best to help and reply to you as soon as possible. Of course, please be considerate and respectful of all people participating in our community interactions.
If you encounter difficulties during installation and/or while using AxonDeepSeg, or have general questions about the project, you can start a new discussion on AxonDeepSeg GitHub Discussions forum. We also encourage you, once you’ve familiarized yourself with the software, to continue participating in the forum by helping answer future questions from fellow users!
If you encounter bugs during installation and/or use of AxonDeepSeg, you can open a new issue ticket on the AxonDeepSeg GitHub issues tracker.
Citation
If you use this work in your research, please cite:
Zaimi, A., Wabartha, M., Herman, V., Antonsanti, P.-L., Perone, C. S., & Cohen-Adad, J. (2018). AxonDeepSeg: automatic axon and myelin segmentation from microscopy data using convolutional neural networks. Scientific Reports, 8(1), 3816. Link to the paper.